
Slow build speed is a huge momentum buster. It’s kind of like driving down the road and constantly hitting speed bump after speed bump. Build speed is critical to your productivity, and over the past few years, the Android team has consistently focused on improving build speed performance.
After implementing the tips in this article, we’ll be able to speed up development build times by 3x, 4x—sometimes even up to 10x. All by simply applying a set of best practices.
To help contextualize and show the impact of these tips, I’m going to use Google’s Santa Tracker Android project as a guiding example.
Before jumping into these tips first we need to quickly review the 3 standard build scenarios.
- Full build (A clean assemble debug build)
- Incremental build: Java change (A one-line Java change in a method implementation)
- Incremental build: resource change (A simple add or remove string resource)
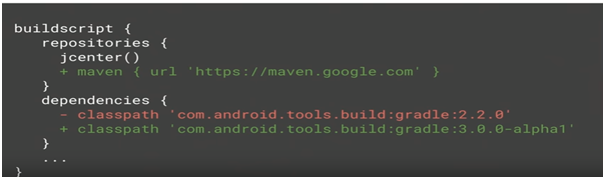
Tip 1: Use the latest Android Gradle Plugin
The first tip might seem self-evident, but it’s worth mentioning. Make sure you’re using the latest Android Gradle plugin.
With each release, the Android team usually includes quite a lot of bug fixes performance improvements, and new features. So you want to make sure that you use the latest Gradle version.
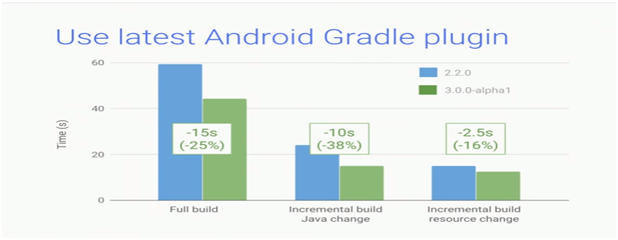
Results
After switching from the old Gradle plugin 2.2.0 to 3.0-alpha1, we shaved off 25% from the full build, 38% from the incremental Java change, and about 16% from the resource change.
Tip 2: Avoid Legacy multidex
As you likely know, if your app exceeds the 64K methods reference limit, then you’ll need to use multidex.
But what you may not know is that if your minSDKVersion is lower than 21 (pre-Lollipop), and you use multidex, you’ll be using a legacy version, which will significantly slow down build times.
Android Studio 2.3+ will automatically avoid this.
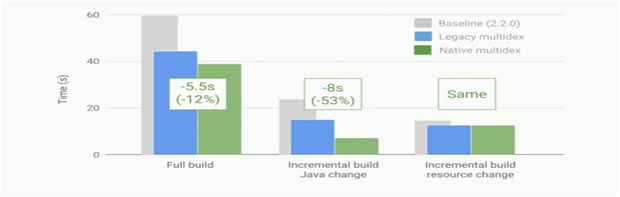
Results
Using the latest version of multidex, we reduced another 5-sec from the full build, and 8-sec from the incremental Java change. The incremental build for the resource change is about the same, as you would expect.
Tip 3: Disable multi-APK
The tip no 3rd is to disable the multi-APK from your development build. Typically, you do this by using the Split Block in a DSL (Domain Specific Language)
Multi-APK allows you to define dimensions when you want to generate multiple SDKs. As such, there’s no need for the development build.
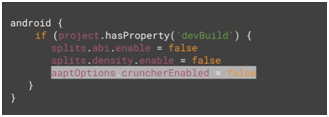
But you can’t just disable multi-APK generation in the split block, because that block is global to all your build variants (like Production, Development). One way is to do this properly is to define a property like devBuild (as shown below), and if Gradle sees that property, it will set both splits.abi and splits.density to false, and the multi-APK generation will not happen.

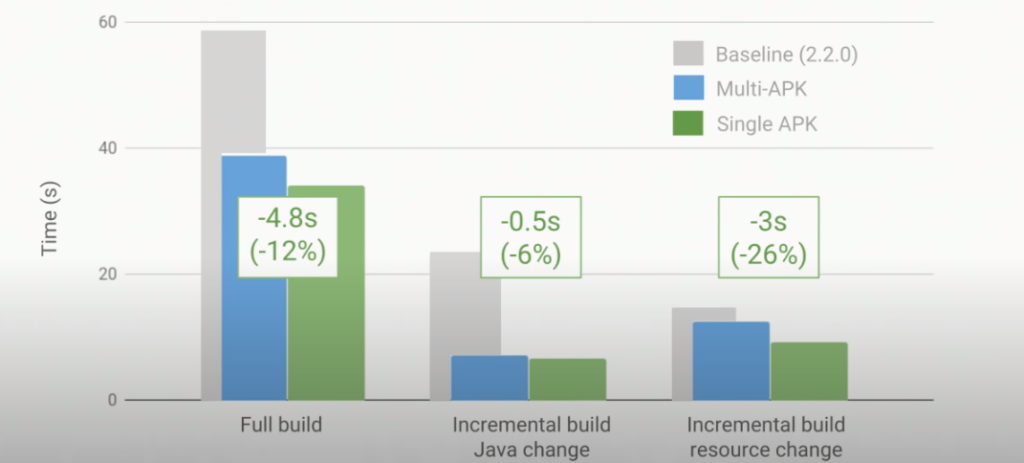
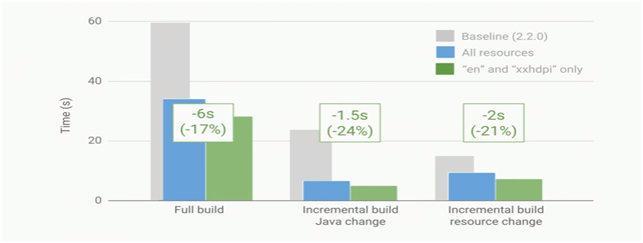
Results
As you can see from the screenshot below, some more improvement across the board.
Tip 4: Include a minimal resource
Tip number four is to minimize the set of resources that you package in the development build.
By default, the build system will include the resources for all the languages and screen densities that your app and the libraries that your app uses define.
So if your app supports different languages or many screen densities, then you actually end up wasting a lot of time making a build — during development, you’re only ever, probably, going to be using one set of those resources.
To fix this issue, you should use the resConfigs keyword and specify the language and the screen density that you actually need for your development build.
Addittionaly, you can only package with the English translation:

Results
You can see below that we reduced another 6 seconds from the full build, shaved 24% off the Incremental Java change, and 21% off the incremental resource change.
Tip 5: Disable PNG Crunching
Next, we can disable PNG crunching. By default APPT will crunch your PNG’s to reduce their size, to make you APK size smaller.
Again, that’s a great thing for your release APK, but not good for the development builds.
So to avoid PNG crunching, we can use the same property we discussed in tip 3. If Gradle sees that property, it will set aaptOptions.cruncherEnabled to false.
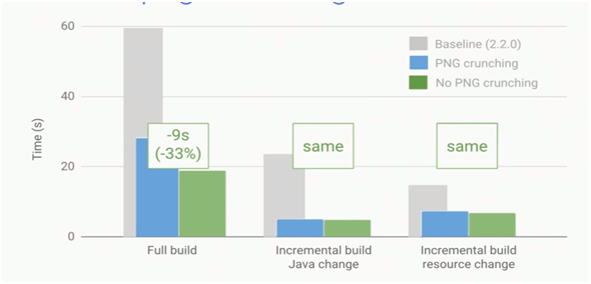
Results
These are the numbers after disabling the PNG crunching. As you can see, we reduced the full build by 9-sec. However, the other two build scenarios didn’t change much.
Tip 6: Use Instant Run
Instant Run is introduced in Android Studio 2.0.
The trade-off is, Instant Run only works with API 21 or above. That doesn’t mean you can’t have your app’s min SDK set to lower. It just means the device you’re running Instant Run on needs to be API 21 or above.
Android Studio now features a couple of buttons that control how much of the application is restarted:
- Run will deploy all changes and restart the application.
- Apply Changes will change your resource and code changes and restart only the activity, without restarting the app.
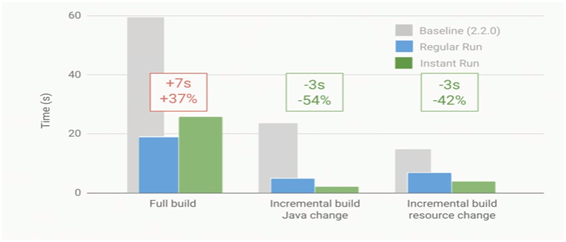
Results
These are the number we got after using Instant Run. We actually regressed by 7-sec for the full build. But notice that for the incremental changes, we have reduced each by 3-sec.
Tip 7: Avoid Inadvertent changes
Tip 7 is a fun one. Essentially, you should avoid inadvertent changes to your project.
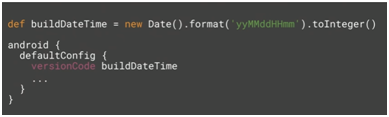
Take a look at the code snippet below. At first glance, the code is very reasonable—basically using the current DateTime as the version code for your app. This is a reasonable thing to do, because every time you build, you want to have a UNIQUE ID so that when your QA team logs a bug, they can tell you which build it was.
But this is actually a bad thing—it forces the Android manifest to change with every build, even when you aren’t giving the build to production or for the testing team (QA).
Results
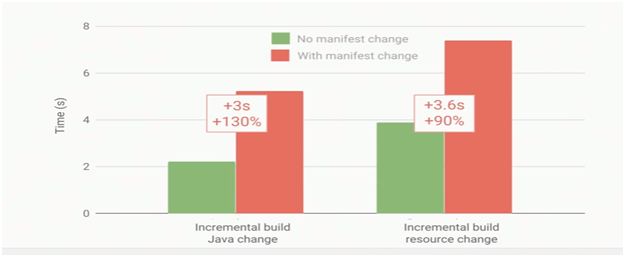
These are the impact on the manifest file by using this DateTime version code: added 3-sec to the incremental Java build, and 3.6-sec to the incremental resource change build. That’s huge. And it’s time spent for no good reason.
To avoid this for development builds, first we need to check what the build variant is.
If the build variant is equal to the development, then there’s no need to set the DateTime, as shown in the below code snippet:
Tip 8: Don’t use dynamic versions of Gradle
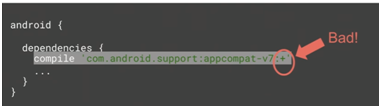
You should avoid using dynamic versions of various dependencies. Gradle provides a very convenient way for you want to use the latest version of a given library through this plus (+) symbol.
Using dynamic versions isn’t ideal for a couple of reasons. From a performance perspective, they will make Gradle check for new versions of a given library every 24 hours, causing your dependency resolution time to increase.
To avoid this issue, always use specific dependency versions—don’t use the plus (+) symbol. Like the below code screenshot.

Tip 9: Watch the memory
You’ll also should be extra careful about the amount of memory you’re giving to Gradle.
In Android Studio, when you create a brand new project, by default Android will give Gradle 1.5 gigabytes of memory. That might be a good setting for your project, or it might be bad—it really depends upon the characteristics of your project.
So you should tweak this setting to figure out what’s optimal for the app you’re building.

Another thing I want to mention here is that in a DSL (Domain Specific Language), we also have dexOptions, which allow you to set the javaMaxHeapSize for the dex process.
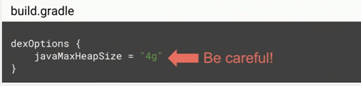
But since the 2.1 version of the plugin, dex is now in-process by default. So no need to set this flag anymore, and if you’re already using it, then delete it.
Tip 10: Enable Gradle Caching
The last (but not least) tip is to enable Gradle caching. This is a new cache mechanism for Gradle where you can cache all outputs from every task.
This is different from the build cache Android introduced in Gradle 2.3, which only cached pre-dex external libraries.
This cache uses the same up-to-date mechanism, but it doesn’t work for the last build—instead, it works for any previous build from any location. This can really speed up your build time when you change local branches (i.e. a feature branch), and it will enable distribution caching.
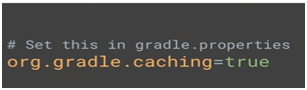
To enable this, just set org.gradle.caching=true in your gradle.properties file.
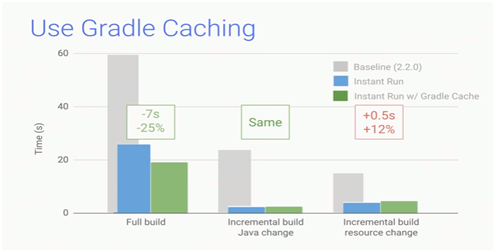
Results
These are the results I got after enabling the cache. We reduced the full build time by 7-sec. The incremental Java change remained the same, and the incremental resource change increased by 0.5-sec.
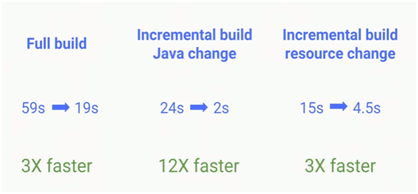
Cumulative Results:
Here are the cumulative result after applying all of these tips. Our full build is 3x faster; the incremental Java change is 12x faster, and the incremental resource change is 3x faster.
Conclusion
In this article, we learned how we can make our Android builds faster by following some really simple tips.
I hope this article is helpful. If you think something is missing, have questions, or would like to offer any thoughts or suggestions, go ahead and leave a comment below. I’d appreciate the feedback.
I’ve written some other Android-related content, and if you liked what you read here, you’ll probably also enjoy these:
Sharing (knowledge) is caring 😊 Thanks for reading this article. Be sure to clap or recommend this article if you found it helpful. It means a lot to me.
If you need any help, join me on Twitter, LinkedIn, GitHub, and Facebook.
Comments 0 Responses