
In our review of object detection papers, we looked at several solutions, including Mask R-CNN. The model classifies and localizes objects using bounding boxes. It also classifies each pixel into a set of categories.
Therefore, it also produces a segmentation mask for each Region of Interest. In this piece, we’ll work through an implementation of Mask R-CNN in Python for image segmentation.
What is Image Segmentation?
Image segmentation (also knowns as semantic segmentation) refers to the process of linking each pixel in an image to a class label. These labels could include a person, car, flower, piece of furniture, etc., just to mention a few.
We can think of semantic segmentation as image classification at a pixel level. For example, in an image that has many cars, segmentation will label all the objects as car objects.
However, a separate class of models known as instance segmentation is able to label the separate instances where an object appears in an image. This kind of segmentation can be very useful in applications that are used to count the number of objects, such as counting the amount of foot traffic in a mall.
How to Conduct Image Segmentation With Mask R-CNN?
We’ll use an open-source implementation of Mask R-CNN by Matterport. It produces bounding boxes and segmentation masks for the objects detected in an image. It’s based on Feature Pyramid Network (FPN) and a ResNet101 backbone. The project contains pre-trained weights from MS COCO. Therefore, we don’t have to train the model from scratch.
We’ll start with a couple of imports:
- os to set the path of our root directory
- skimage for image processing
- Matplotlib for visualization
We then set the root directory.
import os
import sys
import skimage.io
import matplotlib
import matplotlib.pyplot as plt
ROOT_DIR = os.path.abspath("./")
We can now import Mask R-CNN.
sys.path.append(ROOT_DIR)
from mrcnn import utils
import mrcnn.model as modellib
from mrcnn import visualize
Next, we import the configurations for MS COCO. We then set the path for saving the trained model and the logs.
sys.path.append(os.path.join(ROOT_DIR, "coco/"))
import coco
MODEL_DIR = os.path.join(ROOT_DIR, "logs")
COCO_MODEL_PATH = os.path.join(ROOT_DIR, "mask_rcnn_coco.h5")
If the COCO weights aren’t available in our local directory, we download them. After that, we set the path for the images that we’ll use for image segmentation:
if not os.path.exists(COCO_MODEL_PATH):
    utils.download_trained_weights(COCO_MODEL_PATH)

IMAGE_DIR = os.path.join(ROOT_DIR, "images")
Let’s use the COCO config to set the batch size. We set the batch size to 1 since we’ll be running predictions on one image. We then display the configurations.
class InferenceConfig(coco.CocoConfig):
    GPU_COUNT = 1
    IMAGES_PER_GPU = 1
config = InferenceConfig()
config.display()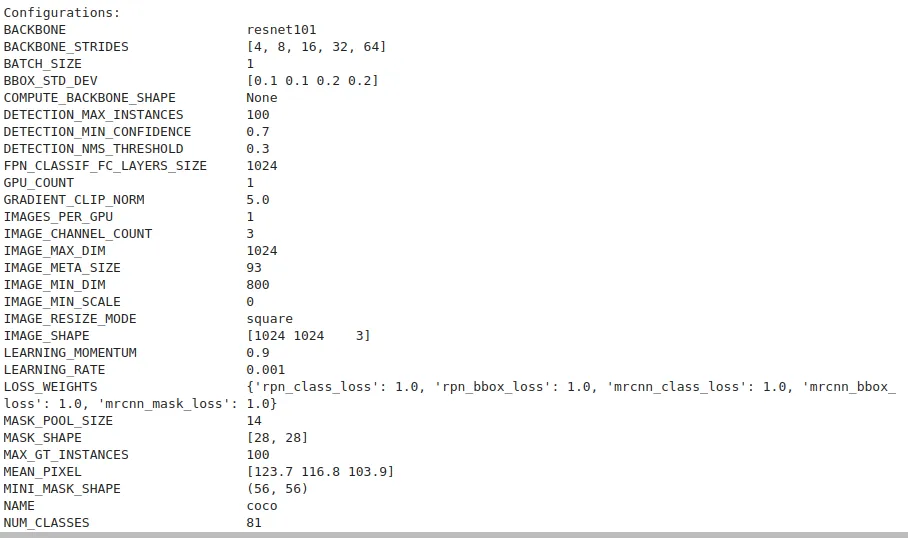
Next we can create an instance of the model. We set the model to inference because we’re not going to be training it. We then load the COCO weights that we downloaded earlier.
model = modellib.MaskRCNN(mode="inference", model_dir=MODEL_DIR, config=config)
model.load_weights(COCO_MODEL_PATH, by_name=True)
From the configuration display, we see that COCO has 81 classes. We create a list with those classes below.
class_names = ['BG', 'person', 'bicycle', 'car', 'motorcycle', 'airplane',
               'bus', 'train', 'truck', 'boat', 'traffic light',
               'fire hydrant', 'stop sign', 'parking meter', 'bench', 'bird',
               'cat', 'dog', 'horse', 'sheep', 'cow', 'elephant', 'bear',
               'zebra', 'giraffe', 'backpack', 'umbrella', 'handbag', 'tie',
               'suitcase', 'frisbee', 'skis', 'snowboard', 'sports ball',
               'kite', 'baseball bat', 'baseball glove', 'skateboard',
               'surfboard', 'tennis racket', 'bottle', 'wine glass', 'cup',
               'fork', 'knife', 'spoon', 'bowl', 'banana', 'apple',
               'sandwich', 'orange', 'broccoli', 'carrot', 'hot dog', 'pizza',
               'donut', 'cake', 'chair', 'couch', 'potted plant', 'bed',
               'dining table', 'toilet', 'tv', 'laptop', 'mouse', 'remote',
               'keyboard', 'cell phone', 'microwave', 'oven', 'toaster',
               'sink', 'refrigerator', 'book', 'clock', 'vase', 'scissors',
               'teddy bear', 'hair drier', 'toothbrush']
Let’s now process the image that we’re going to use:
image = skimage.io.imread(os.path.join(IMAGE_DIR, 'animals.jpg'))With that in place, we can now run the prediction:
results = model.detect([image], verbose=1)Visualizing the results is pretty straightforward:
r = results[0]
visualize.display_instances(image, r['rois'], r['masks'], r['class_ids'],
                            class_names, r['scores'])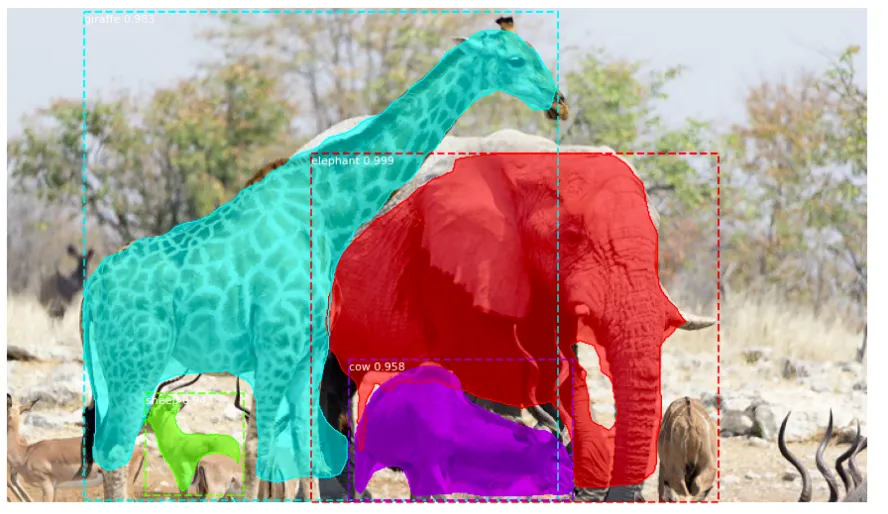
As you can see its pretty simple. However, there are a couple of differences between this implementation and the official paper:
- Resizing of all images to the same size to support the training of multiple images per batch. In the official paper, resizing is done in a manner that the smallest side is 800px and the largest is trimmed at 1000px.
- Ignoring of bounding boxes that come with the dataset in order to generate them on the fly.
- Use of a learning rate lower than the 0.02 proposed in the paper. Lower learning rates converged faster.
Since I made some slight adjustments from the original code on GitHub, I am providing the source code used for this article below.
Conclusion
As you can see, Matterport provides a quick and easy way to implement image segmentation with Mask R-CNN. If you’d like to do your own training on images check this Notebook on their GitHub page. You can also check out my other article on image segmentation.

Comments 0 Responses